Table of contents
- What is Face Recognition?
- Why Use Python for a Face Recognition Project?
- Essential Libraries for a Face Recognition Project in Python
- Step-by-Step Guide to Building a Face Recognition Project in Python
- Enhancing Your Face Recognition in Python
- Applications of a Face Recognition Project in Python
- Conclusion

In recent years, face recognition technology has gained tremendous popularity across various sectors, from security and surveillance to personalized marketing and customer service. Python, known for its simplicity and extensive libraries, is one of the most preferred languages for developing a face recognition project. This article will provide you with a comprehensive guide on creating a face recognition project in Python, covering the essential libraries, tools, and step-by-step instructions to implement this exciting technology.
What is Face Recognition?
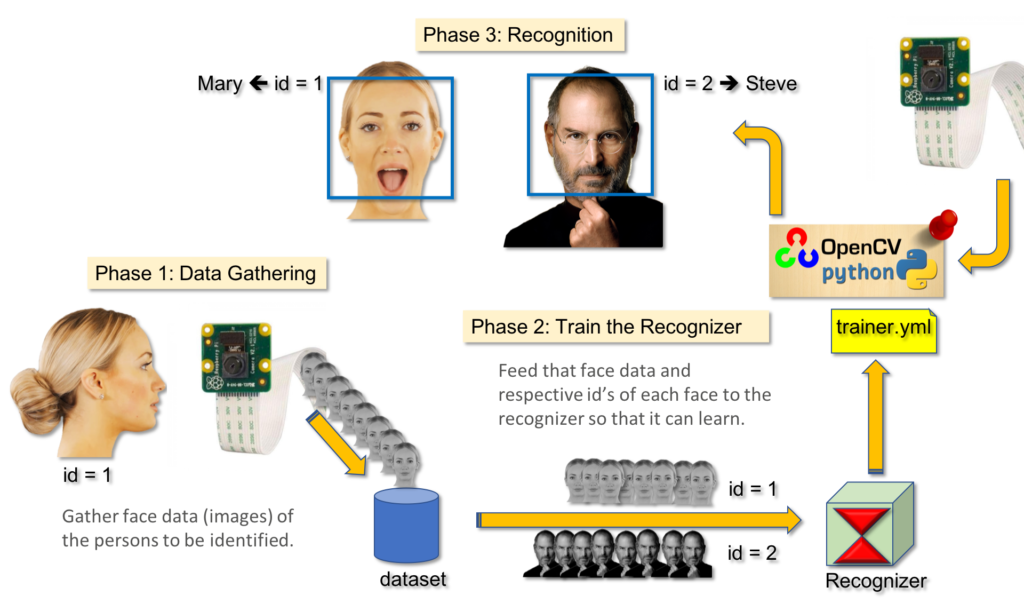
Face recognition is a technology that identifies or verifies a person from a digital image or video frame. This process involves detecting a face in an image, extracting unique facial features, and matching them against a database of known faces. With advancements in machine learning and deep learning, face recognition has become more accurate and reliable, making it ideal for various applications like attendance systems, access control, and personalized experiences.
Why Use Python for a Face Recognition Project?
Python is a popular choice for a face recognition project due to its readability, extensive libraries, and robust community support. Python libraries such as OpenCV, Dlib, and face_recognition provide pre-trained models and functions that simplify the implementation of face recognition systems. Additionally, Python’s versatility allows developers to integrate face recognition with other machine learning, artificial intelligence, and web development projects.
Essential Libraries for a Face Recognition Project in Python
To develop a face recognition project in Python, you need to install several libraries that provide the necessary tools and functions for face detection and recognition. Below are the essential libraries:
- OpenCV: Open Source Computer Vision Library (OpenCV) is a powerful library. Developer uses it for computer vision and image processing. It provides various tools to detect faces in images and videos.
- Dlib: Dlib is a modern C++ toolkit that contains machine learning algorithms and tools for creating complex software. It is widely used for facial landmark detection, face detection, and feature extraction.
- face_recognition: This library, built on top of Dlib, is one of the simplest libraries for face recognition in Python. It provides easy-to-use functions to detect faces, recognize faces, and compute face encodings.
- NumPy: NumPy is a fundamental package for scientific computing in Python. It is used to handle large arrays and matrices of numerical data, which is essential for image processing.
Step-by-Step Guide to Building a Face Recognition Project in Python
Let’s dive into building a face recognition project in Python step-by-step. For this project, we will use the face_recognition library, as it provides simple APIs to work with face recognition models.
Step 1: Install the Required Libraries
To start, you need to install the required libraries. You can use pip, Python’s package installer, to install them:
bashCopy codepip install opencv-python
pip install dlib
pip install face_recognition
pip install numpy
Step 2: Import the Necessary Libraries
Once the libraries are installed, the next step is to import them into your Python script. Create a new Python file and import the necessary libraries:
pythonCopy codeimport cv2
import face_recognition
import numpy as np
Step 3: Load and Prepare the Images
For a face recognition project in Python, you need to have a set of images for training (known faces) and an image for testing (unknown faces). Load these images using OpenCV and convert them from BGR to RGB format, as the face_recognition library works with RGB images.
pythonCopy code# Load a sample picture and learn how to recognize it.
image_of_person = face_recognition.load_image_file('person.jpg')
image_of_person_encoding = face_recognition.face_encodings(image_of_person)[0]

# Load a second sample picture and learn how to recognize it.
test_image = face_recognition.load_image_file('test_image.jpg')
Step 4: Detect Faces in the Image
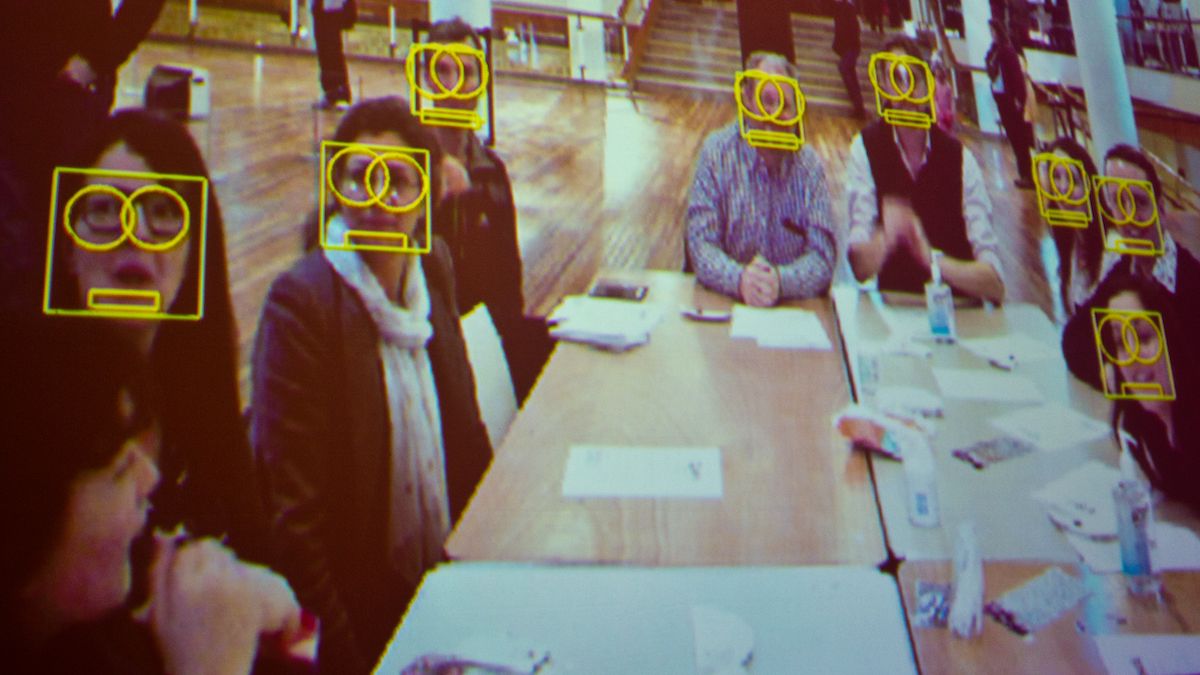
To detect faces in an image, use the face_locations() function from the face_recognition library. This function returns a list of coordinates of the faces detected in the image.
pythonCopy codeface_locations = face_recognition.face_locations(test_image)
print(f"Found {len(face_locations)} face(s) in this photograph.")
Step 5: Encode the Faces
Once you have the locations of the faces, the next step is to encode them. Face encoding is a process that transforms the features of a face into a numeric vector. These vectors are used to compare different faces.
pythonCopy codeface_encodings = face_recognition.face_encodings(test_image, face_locations)
Step 6: Compare Faces and Recognize
Now, we will compare the encoded faces from the test image with the known faces to see if there is a match. The compare_faces() function is used for this purpose.
pythonCopy code# Compare faces
matches = face_recognition.compare_faces([image_of_person_encoding], face_encodings[0])

if matches[0]:
    print("It's a match!")
else:
    print("No match found.")
Step 7: Draw Bounding Boxes Around Recognized Faces
To visualize the recognized faces, draw bounding boxes around them. OpenCV’s cv2.rectangle() function can help you achieve this.
pythonCopy codefor (top, right, bottom, left) in face_locations:
    cv2.rectangle(test_image, (left, top), (right, bottom), (0, 255, 0), 2)

# Display the image with the bounding boxes
cv2.imshow('Face Recognition', test_image)
cv2.waitKey(0)
cv2.destroyAllWindows()
Enhancing Your Face Recognition in Python
Once you have successfully built a basic face recognition in Python, you can enhance it by adding more features:
- Face Recognition from Live Video: Integrate the project with a webcam to recognize faces in real-time.
- Multiple Face Recognition: Expand the database to include multiple people and recognize more than one person at a time.
- Emotion and Age Detection: Integrate additional models to detect emotions or estimate the age of a person along with face recognition.
- Improve Accuracy: Fine-tune the model by using a larger dataset and more advanced algorithms to improve accuracy.
Applications of a Face Recognition Project in Python
A face recognition project in Python has several real-world applications:
- Security and Surveillance: Monitor public spaces and alert security personnel when a person of interest is detected.
- Attendance Systems: Automate attendance in offices and schools by recognizing employees or students.
- Personalized Marketing: Recognize customers in stores and provide personalized offers or services.
- Access Control: Use face recognition to grant or deny access to secure areas.
Conclusion
Building a face recognition project in Python is an exciting way to learn about machine learning, computer vision, and AI. By following the steps outlined in this guide, you can create a functional face recognition system using Python and its powerful libraries like OpenCV, Dlib, and face_recognition. Whether you’re a beginner or an experienced developer, this project will help you understand the fundamentals of face recognition technology and its practical applications. So, roll up your sleeves and start building your face recognition project in Python today!
With Python’s simplicity and the availability of robust libraries, you have all the tools needed to create an efficient face recognition project. Good luck, and enjoy the process of learning and building!
Download Our Official App : Download Now